The dashboard configuration will need to be edited if you want to add to or change what is displayed. This page begins with details of the configuration variables and follows that with a worked example which assumes you are starting with a working configuration and want to change one of the displayed fields. This should provide a pattern for other changes. The page ends with a description of how the configuration is updated on the dashboard and the utilities involved.
query_id | string to enquire signature string. For
Megasquirt, always "Q".
Note:query_id is no longer needed. It is hard-wired to "Q". |
expect_id | expected response to query_id. The signature string from your .INI file. |
query_vals | string to send to Megasquirt to trigger a poll. Megasquirt is expected to respond with a fixed length block of data. Query_vals is usually given a value determined by ms2_request (see below), but can be assigned a literal string if you know the serial protocol well enough. |
resp_len | the length of the block of data expected in response to query_vals. Also usually provided by ms2_request (below). If you roll your own, be sure to allow for any header or checksum that Megasquirt might append. |
pollcycle | Megasquirt is always polled 16 times per second but the dashboard display is only updated every pollcycle polls. Mean, min and max values are started afresh every display update. Last values live outside the poll cycle and always update 16 times per second. This can make text displays unreadable. Pollcycle must be one of 1, 2, 4, 8, 16, 32, 64, 128. |
bg | background colour specification. Two binary values which define a colour gradient from bottom to top of the screen. Best to use with the rgb function. |
palette | optional colour specifications to be used in place of "W","R","Y" and "B" when drawing widgets. Defaults to CFG::rgb(255,255,255) . CFG::rgb(255,144,144) . CFG::rgb(255,255,64) . CFG::rgb(160,255,255) respectively. |
blduty | an array of two values: day and night percentage duty for the LED backlight. Lets you configure how dim the display is when your headlights are on. |
txdelay | Older Megasquirt firmware could miss serial input if it came too fast. This value sets the delay between characters sent to the Megasquirt. Not really necessary with newer firmware, but it doesn't hurt. Units are 8 µs, so a txdelay of 125 will pace characters at 1 ms intervals. |
orientation | display orientation (MADCTL register in ST7735 display controller). Useful values are 0 for normal, 0xc0 for upside-down, 0x40 for mirror, 0x80 for upside-down-mirror. |
divider | SPI clock divider ([1:4], default 1). The display uses the SPI protocol. Depending on the quality of the connection, it may be necessary to slow communications down from the default 12MHz. A divider of 2 will slow it down to 6MHz, etc. |
poll | the Megasquirt is polled 16 times per second (by
sending query_vals). It responds with a string of
resp_len bytes. The poll array tells the dashboard how
to turn this stream of bytes into useful values. Each entry consists
of six definitions:
An example might make o_buf clearer. If your request is built by: %req = ms2_request(17, 9); This is what the dashboard is going to get back from the
Megasquirt.
The blue boxes represent 9 bytes of data starting from byte 17 in the OutputChannels. It is only meaningful to access these bytes. It is also important that 16-bit values be read only at even addresses (along the top) i.e. D1 can only be accessed as a U8 or S8 value. Looking at the version 3.4.2 .INI file, D1 will be the second half of barometer. D1's only purpose here is to put the other data on even addresses. D2,D3 follow; they will be the map value. So given this request, the o_buf for map is 4. If you check the .INI file yourself, you'll see that 6 would get you mat and 8 would get you coolant. |
show | The dashboard contains 8 rows by 2 columns of widget
slots. The show array assigns widgets to these slots. All
slots must be filled, and the array order has to fill them top-down,
left to right. E.g. a double-height (SEG7) widget on the left can't
be immediately followed by a double-width (TRILED) widget. The two
empty slots to the right would have to be filled next. There are only two mandatory values in each show slot:
|
ms2_request, ms2_oldrequest | utility functions
which respectively build the request string for the new and old
Megasquirt serial protocols. There are two arguments:
|
rgb | takes three values in the range [0:255] for red, green and blue colour components and returns a 16-bit packed binary representation of that colour (5 bits for red, 6 bits for green, 5 bits for blue). |
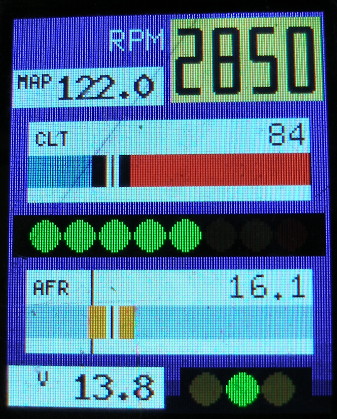
Slot 0 (top left) in the photo showing the optional label "RPM".
All values optional.
label | Up to 4 character constant string. This will be drawn on the otherwise unchanged background gradient. |
inverse | 0 (default) draw the label in white; 1 draw it in black. |
halign | one of left, centre, center, right. Default is left. |
valign | one of top, middle, bottom. Default is top. |
Slots 1 and 3 in the photo are a SEG7 widget, labelled "RPM" by the BLANK field to its left. The MSEG7 is not in the photo, but only differs from the SEG7 in its size. It fills both columns, spans three rows and can display up to five digits.
field | mandatory reference to poll handle. |
label | optional 3 character label occupying the first digit position in the widget. If a digit is drawn there, the label will be overwritten and will not be restored. |
bg | optional widget colour (default "W"): W, R, Y, B (by default these are white, red, yellow, blue, but can be mapped any four colours with the palette option. Depending on the inverse value, this is either the background or foreground colour. The other is always black. |
inverse | 0 (default) for black digits on colour background; 1 for colour digits on a black background. |
loval | mandatory if cmap is specified. Widget colour will be the first colour of the cmap when the field value is below loval. |
hival | mandatory if cmap is specified. Widget colour will be the third colour of the cmap when the field value is above hival. |
cmap | a number between 1 and 4. 1 gives orange, normal, orange; 2 gives blue, normal, red; 3 gives normal, orange, red and 4 gives red, orange, normal. In all cases, "normal" means the colour specified by bg. |
Slot 2 in the photo, showing "MAP" value.
field | mandatory reference to poll handle. |
label | optional 3 character label which will appear in a tiny font at the top left of the widget. |
bg | optional colour specification. One of W, R, Y, B, and behaves just like the SEG7 bg option. |
inverse | 0 (default) for black letters on colour background; 1 for colour letters on black background. |
The BAR widget is little used and may be removed from the firmware in future.
Slots 4-7 in the photo, showing "CLT".
field | mandatory reference to poll handle. |
label | optional 3 character label for the gauge. |
bg | optional background colour: W, R, Y, B with the usual palette override option. |
minval | mandatory. Needle won't go below this value. Text annotation will still show the correct figure. |
maxval | mandatory. Needle won't go above this value. |
blue | mandatory. Area "behind" the needle will be blue from minval to blue. |
red | mandatory. Area "behind" the needle will be red from red to maxval. |
Slots 8 and 9 in the photo, no label.
field | mandatory reference to poll handle. |
minval | mandatory. No LEDs lit when value is below this. |
maxval | mandatory. All LEDs lit when value is above this. Once the first LED is lit, each extra lit LED represents an increment of 1/7th of the range between minval and maxval. |
bound | unimplemented. Notionally it is an array of three values representing the number of green, orange and red LEDs respectively. The numbers must add up to 8 so that all LEDs are assigned. This is supported in the underlying code, but the Perl code, for now, is wired to 5, 2 and 1 respectively. |
The RANGEBAR widget has been removed from the firmware. It remains documented here as a reminder of what used to be.
Slots 10-13 in the photo, showing "AFR".
field | mandatory reference to poll handle. |
label | optional 3 character label for the gauge. |
bg | optional background colour: W, R, Y, B with the usual palette override option. |
minval | mandatory. Needle won't go below this value. Text annotation will still show the correct figure. |
maxval | mandatory. Needle won't go above this value. |
lofield | mandatory reference to a poll handle. Typically this would be a min method collection of the same variable as field. This gives the lower bound for the orange part of the display. |
hifield | mandatory reference to a poll handle. Typically this would be a max method collection of the same variable as field. This gives the upper bound for the orange part of the display. |
tick | mandatory value where the "ideal" tick mark appears in the background of the gauge. |
The TRILED widget may be changed in future. It makes sense to change it to a single-slot widget with just the LEDs. The associated text can then be anywhere around it or left out altogether.
Slots 14 and 15 (bottom row) in the photo, showing "V".
field | mandatory reference to poll handle. |
label | optional 3 character label for the TEXT part of the gauge. |
bg | optional background colour: W, R, Y, B and behaving the same as for TEXT widgets. |
inverse | 0 (default) for black letters on colour background; 1 for colour letters on black background. |
loval | mandatory. Leftmost LED will be illuminated when the field value is below loval. |
hival | mandatory. Rightmost LED will be illuminated when the field value is above hival. |
cmap | mandatory colour map number 0 or 1. If cmap is 0, LEDs left to right will be blue, green, red; if cmap is 1, LEDs will be orange, green, orange. |
This example assumes the dash is talking to an MS2 running the 3.4.2 firmware. We will be looking at that version's .INI file; you will want to be working with the correct .INI file for your installation.
The configuration file is a Perl script. Really, it's just a set of assignments, with the real work being done by the cfg.pm module, but if you already know Perl, the syntax will make sense to you. If you don't know Perl, try to preserve the various hieroglyphics because $, % and other odd characters are pretty important.
Here is the configuration file that we start with:
#!/usr/bin/perl -w use strict; use lib '.'; use cfg; my %req = CFG::ms2_request(1, 29); # # Update configuration here, then run the script to generate the .s19 # file ready to load into info flash. # my %conf = ( # # Ask the connected machine to identify itself # query_id => "Q", # # Response expected # expect_id => "MS2Extra comms342a2\0", # # Query to send regularly to retrieve values. Starts half way # through the time so that shorts are aligned correctly. # # **** New protocol **** # Request odd aligned at start because returned value comes # back with 2-byte length, 1-byte status, body of message. # Because dash copies even-aligned from the buffer, we can # only read the odd part of the seconds. # # Because we're reading one byte into the buffer, all offsets # are increased by 2 (3-1) relative to the .ini file # **** New protocol **** # query_vals => $req{query_vals}, # # Poll cycle -- must be one of 2,4,8,16,32,64,128 # corresponding to gathering that many samples per display # update. Sampling rate is currently fixed at 16/sec. pollcycle => 32, # # Background colour RGB, RGB, wash, bottom to top. # bg => CFG::rgb(144, 0, 0) . CFG::rgb(168, 20, 128), # # Palette specification. Here is the default for W (white), # R (pale red), Y (pale yellow), B (pale blue). Note: dots # between colours, comma at end. # palette => CFG::rgb(255,255,255) . CFG::rgb(255,144,144) . CFG::rgb(255,255,64) . CFG::rgb(160,255,255), # # Backlight duty day/night in [0:100] # blduty => [90, 30], # # Inter-character transmit delay so as not to overrun ECU's # input buffer. x8 usec. # txdelay => 100, # # Expected length of response to value query # resp_len => $req{resp_len}, # # Numbers to poll and how to treat them: # handle: how "show" section will refer to this field # o_buf: offset of variable within query response # o_type: U8,S8,U16,S16,F16(Fahrenheit) # o_method: mean,min,max,last # o_discard: number of digits to drop from RHS of number # o_prec: number of digits after decimal point # poll => [ # RPM -- average { handle => "RPMmean", o_buf => 8, o_type => 'U16', o_method =>'mean', o_discard => 0, o_prec => 0 }, # RPM -- last { handle => "RPMlast", o_buf => 8, o_type => 'U16', o_method =>'last', o_discard => 0, o_prec => 0 }, # MAP -- average { handle => "MAP", o_buf => 20, o_type => "U16", o_method => "mean", o_discard => 0, o_prec => 1 }, # CLT { handle => "CLT", o_buf => 24, o_type => 'F16', o_method => 'mean', o_discard => 1, o_prec => 0 }, # Min AFR (after Mean AFR for same reasons) { handle => "AFRmin", o_buf => 30, o_type => "U16", o_method => "min", o_discard => 0, o_prec => 1 }, # Mean AFR { handle => "AFRmean", o_buf => 30, o_type => "U16", o_method => "mean", o_discard => 0, o_prec => 1 }, # Max AFR { handle => "AFRmax", o_buf => 30, o_type => "U16", o_method => "max", o_discard => 0, o_prec => 1 }, # Mean battery voltage { handle => "Volts", o_buf => 28, o_type => "S16", o_method => "mean", o_discard => 0, o_prec => 1 }, # Mean air temperature { handle => "MAT", o_buf => 22, o_type => "F16", o_method => "mean", o_discard => 1, o_prec => 0 }, # Mean TPS { handle => "TPS", o_buf => 26, o_type => "S16", o_method => "mean", o_discard => 0, o_prec => 1 }, # Seconds { handle => "Time", o_buf => 3, o_type => "U8", o_method => "max", o_discard => 0, o_prec => 0 }, # PW { handle => "PW", o_buf => 4, o_type => "U16", o_method => "mean", o_discard => 2, o_prec => 1 }, ], show => [ { # 0 RPM type => "TEXT", field => "RPMmean", label => "RPM" }, { # 1 MAP type => "TEXT", field => "MAP", label => "MAP" }, { # 2-3 LED bar # RPM LEDs from 500-5500, 5 green, 2 orange, 1 red. type => "LEDBAR", field => "RPMlast", minval => 500, maxval => 5500, bound => [5,2,1] }, { # 4 AFR min type => "TEXT", field => "AFRmin", label => "Min", bg => "Y" }, { # 5 AFR max type => "TEXT", field => "AFRmax", label => "Max", bg => "Y" }, { # 6-7 Mean AFR tri-LED type => "TRILED", field => "AFRmean", label => "AFR", loval => 120, # tenths hival => 160, cmap => 1, # orange green orange bg => "Y" }, { # 8-9 Mean CLT tri-LED type => "TRILED", field => "CLT", label => "CLT", loval => 1670, # 167.0F = 75C hival => 1976, # 197.6F = 92C cmap => 0, # blue green red }, { # 10-11 Batt.V type => "TRILED", field => "Volts", label => "V", loval => 127, # 12.7V low limit hival => 148, # 14.8V high limit cmap => 1, # orange green orange }, { # 12 type => "TEXT", field => "MAT", label => "MAT", bg => 'B' }, { # 13 type => "TEXT", field => "TPS", label => "TPS", bg => 'B' }, { # 14 type => "TEXT", field => "PW", label => "PW", }, { # 15 type => "TEXT", field => "Time", label => "Sec", bg => 'R' }, ], ); CFG::mkconf(\%conf);
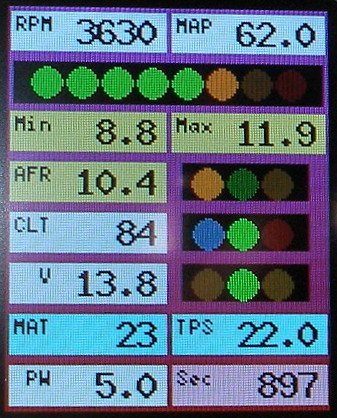
And here is the dashboard display it defines:
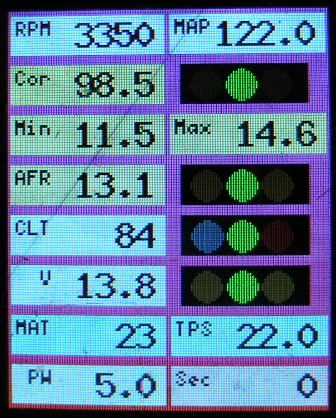
For this example we will replace the existing RPM LEDBAR with EGO Correction as a TRILED widget.
Locate the desired value in the .INI file.
At line 5451, in the OutputChannels section we find:
egoCorrection1 = scalar, S16, 34, "%", 0.1000, 0.0
It is important that the value be a simple scalar, the last number on the line needs to be 0, and the second-last number should be a power of 10. These are respectively offset and scale which are only slightly supported by the dashboard. Here we are fine on these conditions.
Note that the datatype is S16 and its location is 34 bytes into the OutputChannels.
Ensure that the location is within the block currently being polled from the Megasquirt.
It might help if you refer to the diagram in the detailed descriptions.
We noted above that the datatype is S16 (2 bytes) starting at location 34, so 34-35 need to be contained in the requested block.
The existing ms2_request starts with byte 1 and is 29 bytes long. Change the second argument of the request to 35 and EGO Corr will be the at the end of the received block of data.
my %req = CFG::ms2_request(1, 35);
Add the record to the poll section.
Now we know that the value is included in the requested block, we need to tell the dashboard where to find it, and how to interpret it. This happens in the poll section of the config file.
Here is the poll entry used for the RPM LEDBAR from the existing config file:
handle => "RPMlast", o_buf => 8, o_type => 'U16', o_method =>'last', o_discard => 0, o_prec => 0
Firstly, if you look through the whole config file you'll see that there is only one other place where the handle RPMlast is mentioned, and that is in the part of the show section where the LEDBAR is defined. Since we'll be removing that, this poll record will no longer be needed.
Replace the above poll record with:
handle => "EGOCorr", o_buf => 36, o_type => "S16", o_method => "mean", o_discard => 0, o_prec => 1
The handle was chosen to be meaningful and unique in the file and will be referred to in a moment when we define the TRILED widget.
The type is as noted from the .INI file.
Using "mean" method will average samples before displaying them.
Discard of zero means that all digits will be kept.
Prec of 1 is from the scale value from the .INI file. This interacts with discard. Had we discarded a digit, we'd need to make prec 0.
Which leaves us with the tough one: o_buf. This is the offset within the requested block of the first byte of the value. Once again, the diagram may help.
Three things determine the correct o_buf value:
The rule is o_buf = location+header_len-start.
That is 34+3-1 which gives the 36 used above.
NOTE: for all 16-bit data types it is critical that o_buf be an even number. Because of the new protocol's 3-byte header, making the start parameter to the ms2_request call an odd number will ensure this is the case.
Add the widget specification to the show section.
The toughest part is over. We now just need to update the show section. The LEDBAR which is to be replaced is:
# 2-3 LED bar # RPM LEDs from 500-5500, 5 green, 2 orange, 1 red. type => "LEDBAR", field => "RPMlast", minval => 500, maxval => 5500, bound => [5,2,1]
Replace this record with:
# 2-3 TRILED for EGO Correction type => "TRILED", field => "EGOCorr", label => "Cor", loval => 950, hival => 1050, cmap => 1, bg => "Y",
Here, type tells the dashboard to configure a TRILED widget (which will occupy the next two slots), and field refers to handle from the new record in the poll section.
The other values set the behaviour of this widget so that the left orange LED will light up if correction is below 95% and the right orange LED will light up if correction is above 105%. The text field will be on a pale yellow background. Each different sort of widget has its own set of attributes. The TRILED and other widgets are fully documented above.
Two utilities are needed for the dashboard to do anything with your carefully crafted configuration. They are included in the Utilities bundle.
You can work whatever way suits you, but it's probably best to have a dedicated area beneath your home directory. Assuming you have the utilities bundle in /tmp/dashutil.tgz, at the shell prompt:
$ cd $ tar xzf /tmp/dashutil.tgz $ cd dashutil $ ls Makefile cfg.pm flasher flasher.c mkconf_eg1 mkconf_eg2 mkconf_wall $
This has unpacked the bundle into a new dashutil directory in your home. The ls command lists the files:
Makefile | used for rebuilding flasher if necessary. |
cfg.pm | Perl module which, combined with the config file, generates a compact .S19 file ready for the dashboard to download. |
flasher | command which makes configuration files and/or dashboard firmware upgrade files available for the dashboard to download. |
flasher.c | C source code for flasher. |
mkconf_eg1 | example config from tutorial -- before. |
mkconf_eg2 | example config from tutorial -- after. |
mkconf_wall | example config for the ugly all-widgets dashboard. |
mkextra | combines up to 5 mkconf scripts to build a flashable set of alternative layouts. |
The utilities themselves are cfg.pm and flasher.
Assuming your Linux has Perl already installed, it's ready to go.
$ mkconf_eg1 S00700006461736858 S11310000151000000000000144D53324578747201 S11310106120636F6D6D7333343261320000000000 S11310200D00077200070001001D367FC482000016 S113103024200090B0A85A1E64000000000077F538 S1131040010052504D01024D41501201F4017C1532 S11310500500000081044D696E81064D61788505A7 S1131060414652017800A0000503434C5400860613 S1131070B8070507202056017F009400C1084D41A0 S113108054C109545053010B205057410A5365630E S11310900C080400080700140401189C001E050134 S11310A01E04011E06011C0C01169C001A0C0103EF S11310B00200042401000000000000000000000001 S9030000FC $ mkconf_eg1 > /tmp/eg1.s19
The above generates the first example configuration twice. The first time is just for illustration and puts the output to the screen. That's what an .S19 file looks like. If you see something different, something is amiss; might be your Perl installation. The second execution stores the result in /tmp/eg1.s19.
When you run a mkconf script it generates an S19 file for the default configuration -- the one that a newly powered up dashboard will use. If you have a next-conf button, you have the option to switch to alternative layouts. Mkextra lets you take several mkconf scripts and generate a single .s19 file to load them into the alternative configuration area.
$ mkextra mkconf_eg2 mkconf_wall S00700006461736858 S113F4000151000000000000144D5332457874721D S113F4106120636F6D6D733334326132000000001C S113F4200D000772000700010023F71ED929000010 S113F4302A200090B0A85A1E64000000000077F54E S113F440010052504D01024D41508501436F72013C S113F450B6031A0481044D696E81064D61788505F1 S113F460414652017800A0000503434C540086062F S113F470B8070507202056017F009400C1084D41BC S113F48054C109545053010B205057410A5365632A S113F4900C080400240401140401189C001E050136 S113F4A01E04011E06011C0C01169C001A0C01030B S113F4B0020004240100000000000000000000001D S113F4C00151000000000000144D5332457874725D S113F4D06120636F6D6D733334326132000000005C S113F4E00D000772000700010023F71ED929000050 S113F4F02A20000018005A1E64000000000017456E S113F500902052504D860003000001024D415000EE S113F510A00F88130301B0043408A406D007000028 S113F5200000000000434C541204F401501605007E S113F530000004056400C800561BA16AB010561BE5 S113F540A16AACE093000503202056017F009400DB S113F5500000000000000000000008080400189CDF S113F560001404011C0C010807001E04011E0501FF S113F5701E06010000000000000000000000000062 S9030000FC
If you load the above onto your dashboard, the default configuration will be unchanged, but one press of the next-conf button will give you the "eg2" config; another press will give you the "wall" config; one more press will get you back to the default.
If you are using a recent Linux on a 64-bit Intel/AMD processor, the version of flasher in the bundle should work. Quick test is to just enter the command flasher. If you get a "Usage" message, that's good. Otherwise you'll need to recompile it. Recompiling might be as simple as typing "make", but this page assumes your flasher passed the quick test.
It's finally time to communicate with the dashboard. Firstly, a warning: flashing the dashboard can potentially leave it in a bad state -- displaying gibberish or even "bricked" (i.e. unable to be reflashed through RS-232; can still be reflashed via JTAG using a TI Launchpad development board). Try to make sure your RS-232 connection is not noisy, and don't disconnect the cable in the middle of things. The download firmware tries to do everything safely but it's not completely bulletproof. At your own risk and all that.
Now hardware. Your computer needs a serial port -- either built-in or through a USB adapter -- and you need to know its name. A built in serial port will usually be called /dev/ttyS0 or /dev/ttyS1. An adapter can end up with various names; usually something like /dev/ttyACM0 or /dev/ttyUSB0. Try plugging in the adapter and looking at the output of the dmesg command.
You will need a null-modem connection between your computer serial port and the dashboard serial port (typically pull the dashboard's serial plug from the Megasquirt and connect the null modem to the cable). Lastly the dashboard needs to be powered on: turn on the ignition. You should see a "No comms" message on the dashboard display.
Assuming your laptop's serial port is called /dev/ttyACM0 and that you still have the above .S19 file in your /tmp directory, you can load that config on your dashboard with the command:
$ flasher -p /dev/ttyACM0 /tmp/eg1.s19 'Q''M''B'Request for config segment #0 'B'Request for config segment #1 'B'Request for config segment #2 $
On the laptop, those messages tell you that configuration blocks are being downloaded by the dashboard. The dashboard will reboot once they have been written to flash, and you can reconnect the dash serial cable to the Megasquirt and admire your reconfigured dashboard.
Don't panic if the dash isn't what you expected. See if you can make any sense of what you can see and try the configuration process again.
This is admittedly not the easiest thing in the world to deal with, but it is very flexible and not so bad once you're used to it. You should have received a copy of your original configuration via e-mail when your board was mailed to you. That should give you a decent starting point.
The biggest challenge you might face is if you want to upgrade your Megasquirt firmware. If the OutputChannels or the serial protocol have changed, all your o_buf values will need to be reviewed.
Upgrades to the dashboard firmware are expected to add capabilities without breaking existing configurations. BAR will only be removed (as warned) if nobody at all is using it. You should therefore be safe to flash firmware updates, but it also means you won't see much benefit from them unless you change your config to use the new features.
You are welcome to e-mail me with cries for help or suggestions at robsproj9@gmail.com, or pm me as robs on the MSExtra Forum.
Good luck.